
Before this project, our laundry sat in containers stacked on the floor. It was a haven for dust trap dust and who knows what else. Vacuuming the space was a pain.
I broke this up into two builds so I could go through the entire process with my design. I wanted to see how everything would ultimately come together and expose any shortcomings in the design before getting to the second set.
Design
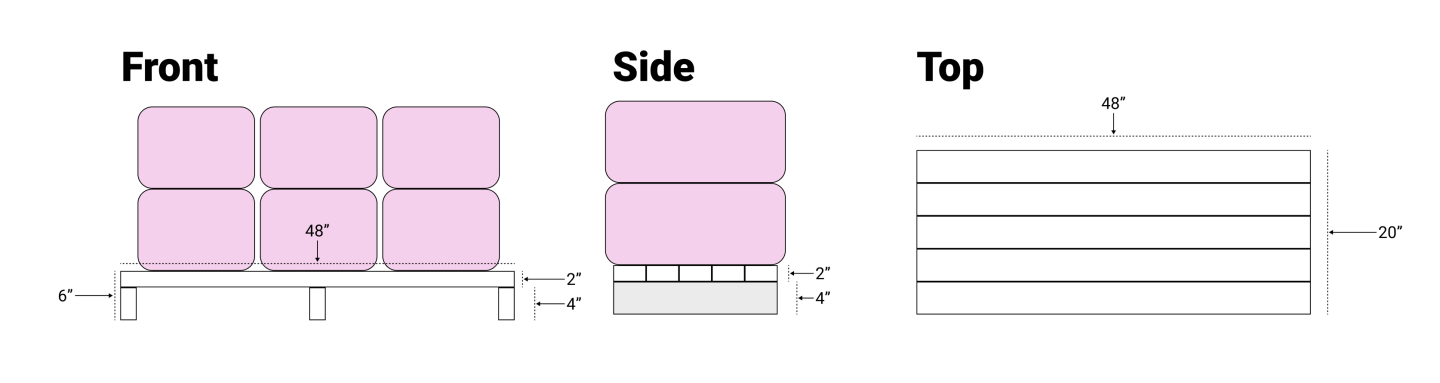
I had to iterate through a few versions of the design. I started with a basic single-level shelf lifted a few inches off the ground. This would solve the immediate need of making it easier to clean the closet.
However, from a UX perspective, I wanted to make it easier to navigate through the grid of stacked bins. It would be less cumbersome to access each bin if they were not stacked, forcing you to unstack them to reach the lower levels.
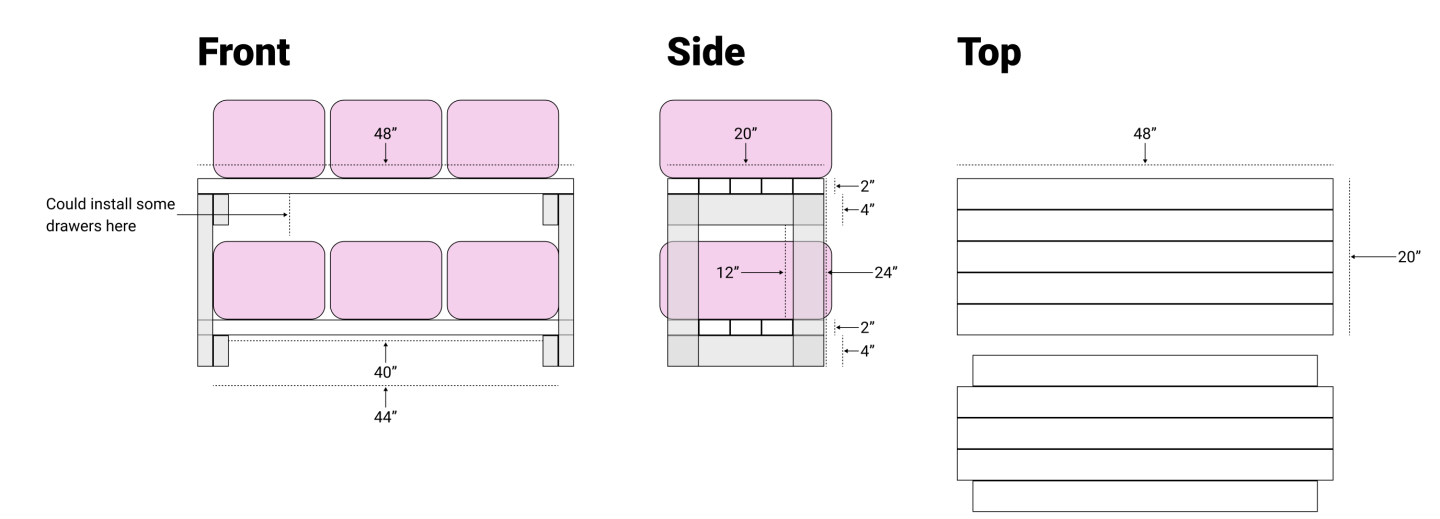
Ultimately, the stretch goal was abandoned after pricing out the cost of lumber. The single-level design cost less than half of the double level design and would be simpler to build. I made a promise to myself that I’d come back and iterate on the multi-level design in the future.
Costs
Lumber
| Design | Board Feet | Red Oak | Poplar |
| Double | 91.7 | $206.25 | $194.79 |
| Single | 41.7 | $93.75 | $88.54 |
All-in
I also spent on some hardware to assemble everything and the shop time costs.
| Item | Note | Cost |
| Lumber | Red Oak + Poplar | $130 |
| Hardware | Deck screws | $30 |
| Woodshop | $17.25 / hour, 12 hours | $207 |
| All-in | $367 |
Steps
- Chopping
- Ripping
- Jointing
- Planing
- Ripping again
- Sanding
- Pre-Drilling
- Screwing
Learnings
- Oak is hard! I knew conceptually that Oak is harder than Poplar, but knowing a Janka number is nothing compared to feeling the wood push back against a drill bit or table saw. I initially chose red oak because I wanted to ensure that the design would, be able to withstand the gravitational force of all the laundry bins, but mid-build I decided to use my leftover cutoff to add another support under the center of the shelf, removing this hardness requirement.
- Take the time to cost out your lumber based on the design before you get to the lumber shop to avoid getting sticker shock. I ended up shopping around based on BF price. Know exactly how much lumber you need to avoid overbuying.
- Don’t forget to bake in the cut off and milling losses when you’re estimating the lumber requirements. My 6/4 boards ended up being closer to 5/4 after all the jointing, planing, and sanding.
- Don’t forget your pilot holes. Predrill the groove portion to about the size of the shank of the screw.
- It’s easier to joint 6 smaller boards than 3 larger ones
- When trying to get boards to the same thickness, use the planer, not the sander—the sander will take ages.
- If you’re screwing two pieces of wood together, clamp them together so you can ensure that the pilot holes are aligned
- It’s ok to drill deeper than the screw.
- Don’t fall in the trap of over sanding.
- Check your measurements before you cut!
Leave a Reply