
As we thought about our first Christmas in Seattle, we were torn between all of the options. Do we buy a tree from some lot nearby? Do we drive out to a farm and cut our own tree down? Do we go for an alternative to the traditional Christmas tree?
TL;DR: I built us our own tree.
We weighed the options and we thought about all the effort we’ve put into curating the food in our kitchen… We wanted as much organic as possible to reduce or eliminate the presence of pesticides in the home.
Why shouldn’t we apply this same thinking to a big wooden tree that would be sitting in the middle of our toddler’s playroom for over a month? I was also not excited about the idea of bringing a tree into our home to slowly wither and be discarded at the end of the season. There was something hauntingly sad about that thought.
So I did a little research into tree alternatives and found myself drawn to the wooden options. We’ve been slowly filling our home with wooden furnishings, so getting a wooden tree felt like a natural next step. The irony of wooden boards being cut to resemble a tree doesn’t escape me here.
From what I could see on the internet, there were a myriad of plans for how to make a wooden tree, but I found myself drawn to a style that involved rotating bars on a pole. The rotation gave you customizability for how to arrange the branches. Each of the branches was a nice place for ornaments.
My mind quickly deconstructed the pieces and I realized that I could probably build a tree like this rather than paying over $100 on Etsy. A regular tree from Home Depot was around $80.
I had access to the woodshop, and I knew where to buy lumber, so I thought I’d give it a shot. Here’s how it went.
Designing the Tree
Because I was inspired by trees I saw on Etsy, this might look similar to others—it’s a wooden tree with rotating branches and a wooden base. But that’s where the similarities end.
I started by calculating how high I wanted our tree to be—about 72″ tall. This was an arbitrary height—I just wanted a tree taller than me.
Then I decided I wanted our branches to be 1″ thick with 1″ spacer cubes in between each branch to give the tree an airy feel. I also wanted to have a few spacers on the bottom to create about 6″ or so of space for presents below the tree.
So with 72″ to allocate between 1″ branches and 1″ spacers, I figured I could have about 30 branches while leaving some space at the bottom for the gifts and the base.
I used my plan to estimate how much lumber I would need to buy from the lumber shop in order to yield the pieces I would need. Even with this planning, I ended up overbuying and had some leftover poplar which I was able to use up to build a riser shelf for a standing desk.
It’s not obvious to tell here, but each branch and spacer are going to be square prisms measuring 1″ wide by 1″ high and varying lengths. I planned for a wooden dowel to run through the center of every single bar and spacer to serve as the trunk of the tree, and I needed this trunk to be thick enough to not snap in half when standing, so I went with a 5/8″ dowel thickness.
1″ x 1″ prisms with 5/8″ holes in the center—what could go wrong? We will soon find out.
Steps
Tree
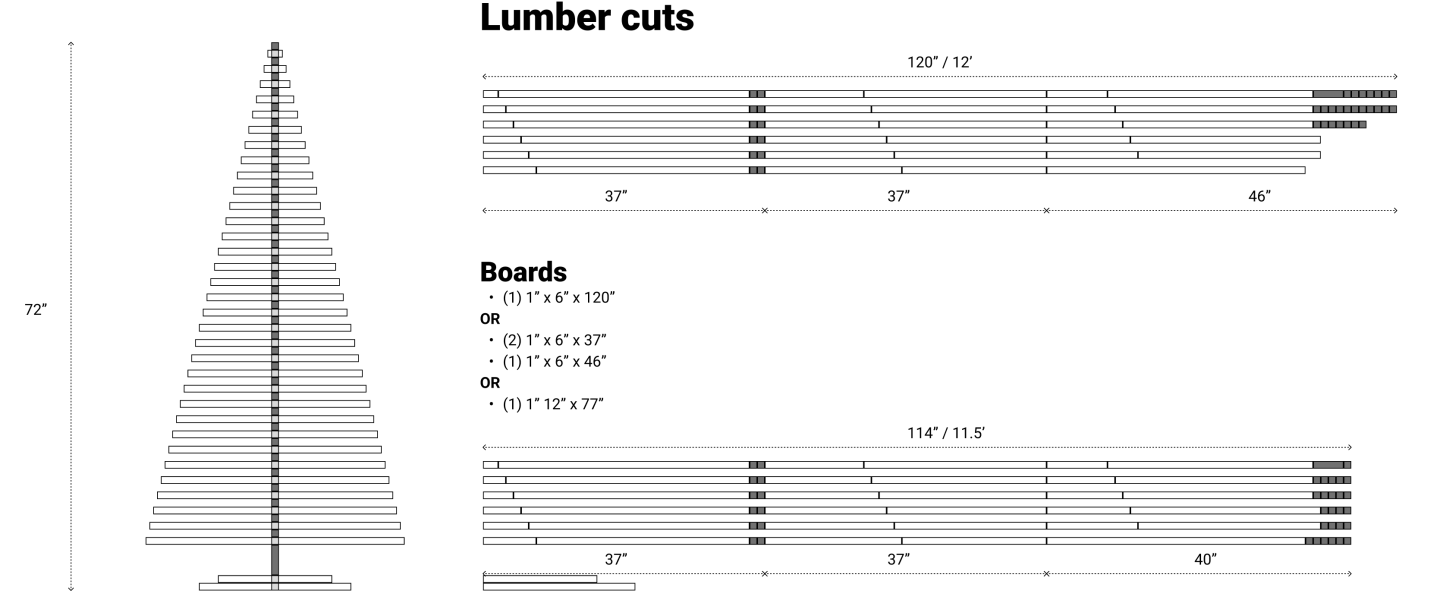
- Chop: First stop is the chop—I had some pretty lengthy boards that I needed to cut down to size to make more more manageable jointing. From the design,you can see that one very long board becomes three shorter boards.
- Joint: Took those boards flat pretty easily with the help of some pencil marks.
- Plane: Pretty straightforward here, just needed to make sure we were planing to the same height for all of them—came into the 1″ thickness pretty easily.
- Rip: Now here’s where things start to get fun—we need to rip the three boards into 1″ bars.
- Chop: Now for another chop. I designed the 1″ bars such that they would be bisected at incrementing distances to create the various branches of the tree. A single 38″ bar can be cut into a 1″ square and a 37″ bar. The next one yields a 2″ bar and a 36″ bar, and so on.
- Dowel joinery: Taking a break from the bars, I needed to create the dowel that would span the trunk of the tree. Problem is I only had 48″ dowels, but we needed a 72″ dowel. We had the idea to use smaller dowels to reinforce a half-lap join for the two dowels. This worked temporarily, but the frankendowel broke at the end of the lap—the dowel reinforcements worked, but not the wood. I ended up using a drill and another dowel to create a mortise-and-tenon situation to reinforce a butt join of the other ends of the dowel. It was hacky, but it worked.
- Drill: Back to the bars, it was time to drill our 5/8″ holes. This was a very trial-and-error situation where we broke several spacers trying to figure out the sweet spot of drill speed, penetration force, and the right set of jigs to hold the small pieces in place while the drill comes down. We got it done using a 5/8″ forstner bit. In retrospect, I wish I had drilled the holes before chopping the bars into such small pieces—particularly for the spacers.
- Sand: I was out of shop time by this point, so I did the sanding at home. In retrospect, I should have done it at the shop because hand sanding that many pieces as a pain in the ass.
Base
- Joint: Our base will be made of two live edge slabs of maple—the lumber store was having a sale so I pivoted at the last second to use these two. However, while jointing one of them, I ended up losing focus and jointed in a slanted edge into one of them, removing way more material than I intended. To compensate, I would be pivoting from a butt join to a half-lap join instead, which takes us to routing.
- Route: After working out how I could fit my nice slab into the slanted slab, I figured i’d need to hog out a good chunk of wood to create the half-lap. This was my first time using a router table, and it did not go well. I foolishly tried to take off too much material on the first pass instead of going gradually and ended up snapping a router bit in the process. It may have been old, but I still pushed it too hard. But we got it done in the end.
- Drill: With the half laps looking good, the last bit was to drill in the holes for the central dowel so that the two slabs lined up nicely. We used the drill press for this and it turned out well. I probably could have finessed a slightly smaller hole for a more snug fit, but after all of the other mishaps so far, I was worried of doing further damage to the dowel by forcing a tight fit.
Once everything has been milled, drilled, sanded, etc. we move on to assembling at home. This is where everything really started to come together. All of the mishaps along the way soon forgotten as the tree rose in the living room, swaying slightly with the weight of the Christmas lights, but not falling.